Keep Social Honest – 5 tips on how to ensure your brand is honest and transparent online. An animated video I edited for The Chartered Institute of Marketing, who provided the graphics and script. #keepsocialhonest
Uncategorised
Where dreams begin…
Darley Stud commissioned a special film to mark the launch of its new website – www.darleychina.com
The film is in keeping with the stylish, modern feel of the website, celebrating and capturing the beauty, power and mystique of the stars of Darley – its remarkable stallions.
I, along with the rest of the team at CPL, have been involved in planning, filming and editing of this project.
Two days of filming from breath-taking 240fps slow-mo to heart-pounding galloping shots in these superb locations in England and Ireland.
Bam! Trailer video
This movie trailer style video was made to accompany the email invites sent out to all guests of the Darley Stallion Parade, a two-day annual event held at its Newmarket headquarters.
Though primarily I used footage from the previous year’s event, I also got the camera out and captured a few extra detail shots (see the umbrella and rain puddle) to achieve a broader reach since the supplied footage package didn’t cover that.
Timelapse footage was the result of two GoPro cameras we installed during the event preparation stage.
How to create videos in-house

Introduction
Using video is a great way to bring your company’s messages to life.
While nothing can replace good, high-quality produced videos, sometimes restricted budgets, the need for a quick turnaround or for a ‘home-made’ look can mean producing videos in-house could be a better option.
The quality of the video is greatly affected by the equipment used and the experience of the person producing it, but following a few simple rules can significantly improve the quality.
Equipment
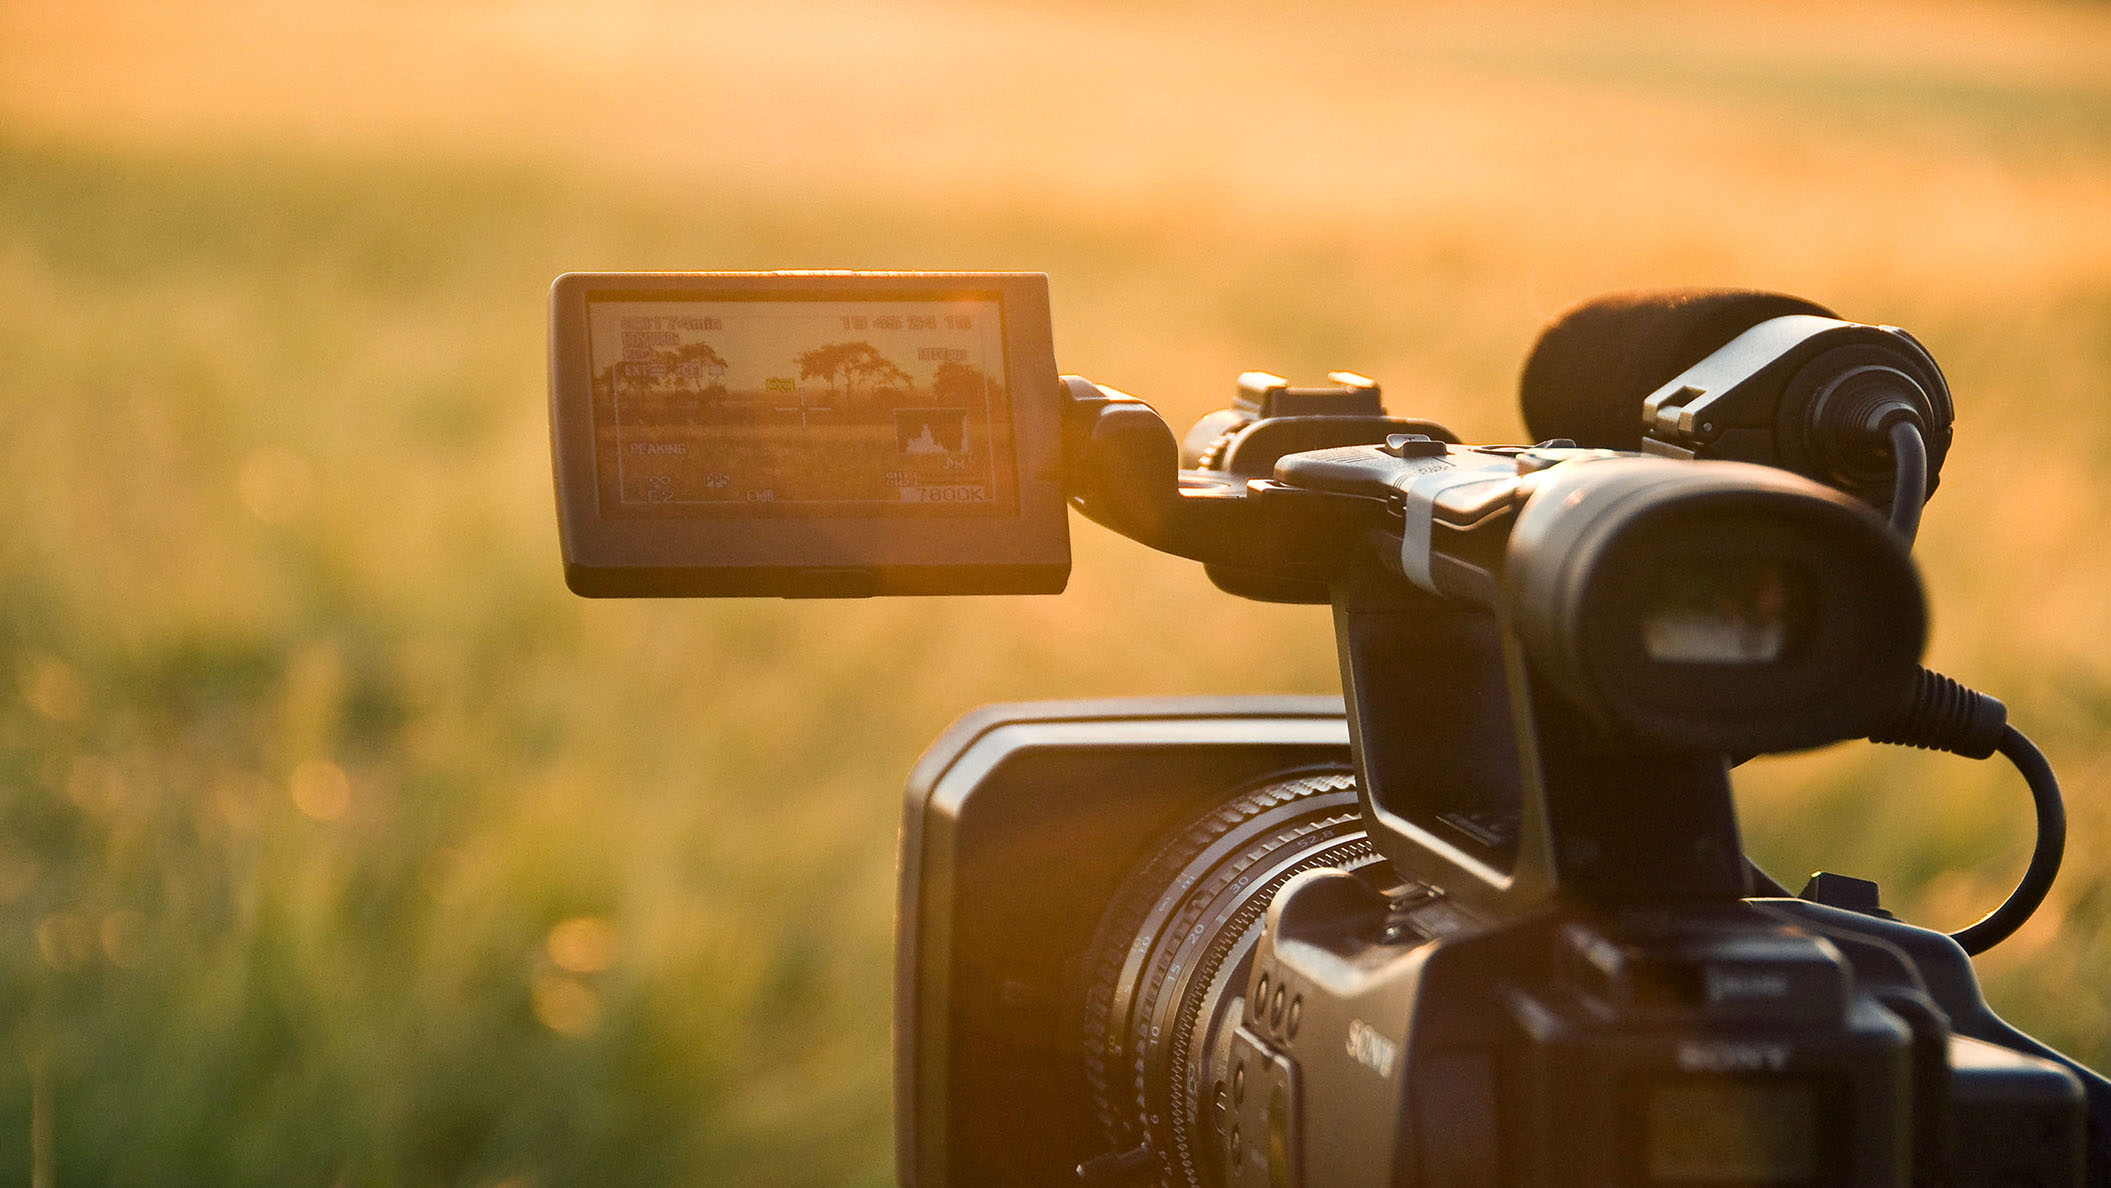
Video camera
A good camera will cost more but it will produce better quality images, will have better light sensitivity for indoor use and allow, for example, external audio input.
The resolution should be at least HD 1080p. This is quite common these days and is enough for most videos that will be distributed online.
Some general rules regarding cameras:
- The larger the diameter of the lens the more light the camera can capture
- When marked at the front of the lens, the F number will indicate how much light can pass through the lens; For example f/2.0 is far better than f/3.0
- Optical image stabilization (sometimes abbreviated as OIS) is better than SteadyShot or similar software/electronic solutions
- An audio input in the form of 3.5 mm jack or XLR connector is desirable
While huge progress has been made in smartphone camera technology in recent years they are still not anywhere close to a dedicated photo/video camera. But where they lack in quality, they excel in portability, ease of deployment and affordability. They are in everyone’s pocket and can be the perfect tool for news-style in-house videos or especially live-streaming. The high end smartphones can produce impressive quality videos if used right and with the right lighting.
Sound
Sound is just as or, arguably more important than, the video. The message of your video is conveyed through the voice of your speaker, so having clear, good quality sound is vital.
Sound is best captured as close as possible to the source therefore the on-camera microphone will not produce decent results. Investing in a lapel microphone will significantly increase the value of your videos. A wireless lapel microphone will give you this quality with the added freedom of being at any distance from your subject.
Tripod or stabilisation
A tripod or any form of stabilisation for the camera will increase the value of the video. Tripods are preferred but, when these aren’t available, you can place the camera on a table, a stack of books or just lean against a wall if you’re holding the camera in your hands. There are cheap tripods or monopods available from smartphones or small cameras. The key is to keep the camera as steady as possible.
Light
Large amounts of light are required, especially when using a non-professional camera. These usually have poor low-light performance and create poor results indoors.
The subject should be filmed in a well-lit room with large windows and light-coloured walls that would further bounce the light.
Sometimes, older fluorescent light tubes can have a flickering effect on your video so those locations should be avoided.
Cameraman
Framing
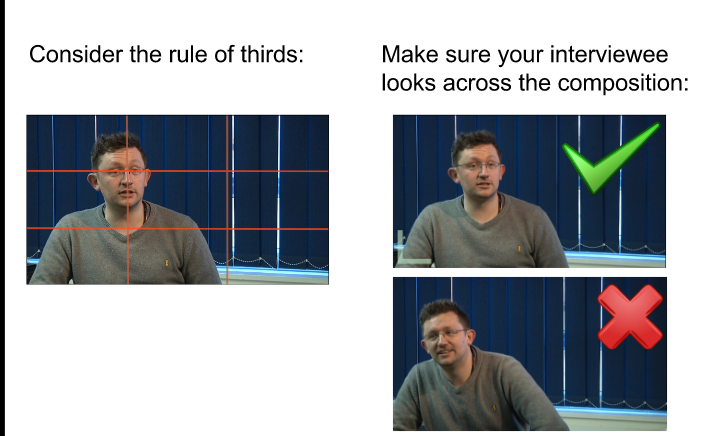
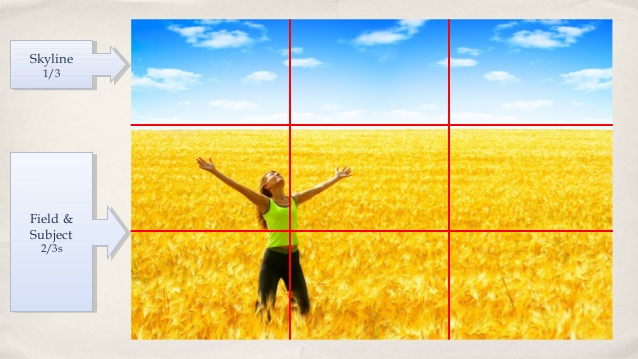
A very simple but important rule when framing a shot is called the rule of thirds.
If you split the screen in three, both horizontally and vertically, the best position to place your subject is at the intersection of two lines:
When shooting an interviewee their eyes should be located roughly in one of those points and they should be looking ‘into’ the frame:
Similarly, when shooting a landscape, the same rule applies and the horizon should be roughly on one of the horizontal lines

Angles
Make sure you film your subject from the same height – the camera lens needs to be at the same height as their the subject’s eyes. Lowering or raising the camera in relation to the subject can send subtle messages to the viewer (ie a lower angle empowers the subject, while a higher angle minimises it). Ideally the interviewee should look at the interviewer, not in the camera lens and the ideal angle between the camera and the interviewer is 30º.
Lighting
Natural light is the best option by far. Make use of any large windows if possible.
Don’t place any windows or strong light sources behind the subject, creating a ‘contre-jour’ effect.
Make sure there is a soft light that doesn’t produce harsh shadows on your subject. A cheap camera will not have good detail in very dark shadowed areas. For that reason avoid placing the subject in direct sunlight. The interviewee will also squint their eyes in direct sunlight.
Some cameras will produce poor results or will display video flickering when used under typical office fluorescent light. Halogen or other forms of ‘continuous’ light is prefered.
Sound
Make sure you film your interviews or any voice recordings in a quiet environment.
When you have to rely on the on-camera microphone it is extremely important to get as close as possible to the subject and record the video in a quiet environment. Getting the camera that close to the subject when using the on-camera microphone will not produce flattering results, so an external microphone is preferred.
When a hand-held microphone that will appear in the shot is not desired, a lapel or tie clip microphone are the prefered solutions. To allow more flexibility these can be wireless as well. A lapel microphone needs to be as close as possible to the interviewee’s chin without looking too obtrusive in the shot.

Reduce background noise as much as possible. Bad sound can’t be repaired in post-production.
Reporter
Make sure to write down and confirm the spelling of the first and last name of a person and their role at the beginning of the interview. Ideally, facilitate the filming of a name badge at beginning of the interview to help in the editing.
Legal permission should be obtained in writing or, as a bare minimum, in the form of video recording. Eg: The interviewee should say “I, John Smith, grant permission for this to be used on the web”.
Phrase your questions so that they are open-ended, which allows the interviewee to provide more detail.
• Example of a closed question:
Q. Are you unhappy with the outcome?
A. Yes.
• Instead, use an open question:
Q. Tell me how you feel about the outcome and why.
A. I feel confused and disappointed about the outcome because…
Please ask the interviewee to phrase the answer by including the subject. This is very important in the editing process as the subject might not be included in the desired cut.
• Example: “The conference was a huge success” not “It was a huge success”
Engage with your interviewee and pay attention to their answers, don’t be distracted or read/prepare your next questions. Try to get them to talk as much as possible and never cut them off when they are speaking. Try not to approve their answers with “Yes”, “I see” or “mmm”. Use only visual forms of engagement (ie nodding) which would be off-camera rather than any audio that would be picked up by the microphone.
The person should look the interviewer in the eyes and not at the camera.
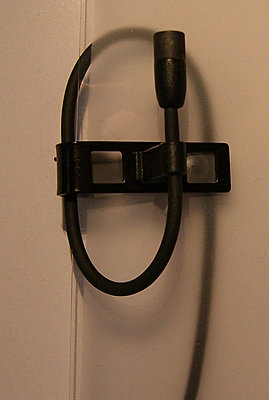
During an interview we will usually record sound using lapel microphones, or tie-clip microphones. These need to be attached to the jacket or tie and the cable run under the jacket/shirt to conceal it. See this picture.
If using a handheld cardioid microphone the optimal position is a couple of inches below and in front of the speaker’s chin, pointing up at their mouth. See this picture
Backgrounds, locations, lighting – Ideally, the interview should take place in the environment of the interviewee (e.g: a mechanic in a garage) to give context and make the story more interesting and informative. Avoid places that are too noisy. If possible isolate the person from the action so you can hear them better. Make sure there are no barking dogs, crying babies, traffic noises, etc, which will distract your viewers. Sound quality is often more crucial to the viewer than image quality.
Interviewee
Most people will behave unnaturally when a camera is pointed at them. This is normal.
Start with easy questions that they feel most comfortable answering to get them used to the setup and allow them to connect with the interviewer and forget about the camera.
Be as sociable as possible with the interviewee, make them as comfortable as possible and get them relaxed before you start asking the important questions.
Legal aspects
Obtaining consent from entities – From a legal point of view, we can only film in public spaces, or private spaces if written permission is granted. Permission should be granted both by the organiser of the event and the landlord. If permission cannot be obtained, ask, for example, security guards, where their jurisdiction ends and move yourself there instead…
A unique example is the City of London where all land, including streets, is private property.
Obtaining consent from individuals – Legally, we can’t use anyone’s face or voice without permission. A consent form should, ideally, be signed by the individual being filmed. Verbal consent can be considered or recording the verbal consent on video.
Occasionally people will try to withdraw their consent prior to distribution of content. Generally, no-one has the right to prevent their contribution being used. There are certain exceptions, for example, where there are contractual obligations.
Public Liability Insurance. This should be considered prior to filming and, if needed, supplied to the event organiser along with a risk assessment and call sheet.
Disclaimer: this document was put together for a client looking to produce more video content in-house. While this was commissioned by the client, the copyright was retained.
Snap! Clap! 10 seconds video
I really love how this short, 10 seconds video came out.
It’s fun and snappy while still delivering a strong message for the client.
Hello world!
Welcome to WordPress. This is your first post. Edit or delete it, then start blogging!